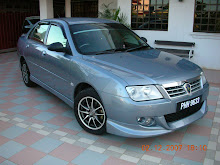
Car Detailing before going back KL, this only can be done in my hometown where i have the place to do it, basement parking in my KL apartment in KL not a good place to detail my car. Dark and no water supply.


Step 1:
Mixture of 2 caps full of Permaglass shampoo to 3 liters of water.
Wash and rinse car. (Of course la)
Armor All Wheel cleaner for my sport rims.
Step 2:
Claying Process.
After washing your car, run your palm and fingertips of your clean hand across the top surfaces. Don't be surprised if what you feel is rough and bumpy. The roughness you feel is the presence of harmful environmental bonded contaminants such as over-spay, fallout, brake dust, tree sap mist and more that have bonded to your paint finish. Most of these contaminants will wash right off if immediately addressed, however, others bond to the finish and week by week, if not dealt with, will gradually mask and blur the reflection. To remove these bonded contaminants and bring back that "smooth-as-glass" finish, this will require an extra step, prior to polishing and waxing, commonly referred to as "claying".
Lubricant use for claying:
 Look at the dirt, contaminants on the clay bar although i've washed the car.
 This is just on the bonnet of my car.
Step 3:
Dry car. The part i hate the most.
I just use non Microfiber cloth for drying. Next detailing shopping list: Microfiber cloth.
Step 4:
Polishing using Turtle Wax Polishing Compound.
Remove mild swirl marks and oxidation from paint.
Scratches done by cat on my bonnet!
Turtle wax polishing compound on dry cloth. (I never choose Meguairs' products, cause i just like the brand name of 'TURTLE' Wax)Ninja Turtle fan since young. ^^
Polish a small area in circular motion and on top area of the car, finish with a front/back motion and on side area of the car, finish with up/down motion.
Scratches gone!
Continue polished the whole car. (The most tiring part of the whole detailing process, i need a polishing machine in future)
A polish is more like a paint conditioner that restores valuable oils to the paint, eliminates fine scratches and creates incredible high gloss not possible with waxes.
Step 5:
Wax (Soft 99) * No money buy Turtle Wax or Meguairs', too expensive.
Wax to protect polished paint surface, and giving mirror effect.
Apply wax in circular motion using the sponge provided.


Step 6:
Wipe off wax using dry cloth.
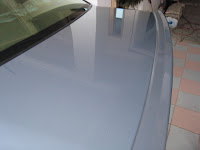
Finally, the results:
It took me 3 hours to complete my detailing, but it's worth it.
Will take more photos tomorrow under bright sunlight.
The End.
 K&N Drop in air filter
 Twin tip S flow rear muffler
 Installation process


